After you update your URL to point to the StickyFolios IP address, you will need to add it to your StickyFolios account. Once added to your account, you can select the Custom Domain when building your StickyFolios sites.
This is the second step in the process of setting up your Custom Domain. Before you do this, you must first point your domain to our servers.
How do I set up My Domain
Step 2- Add your domain to your StickyFolios account:
First, be sure you have updated your DNS (domain name server) settings to point the URL you are using to StickyFolios. If you have not done this yet, start here: Setting up your Custom Domain
Then add the URL you created to your StickyFolios Account:
Select the Account tab
Click on Custom Domains
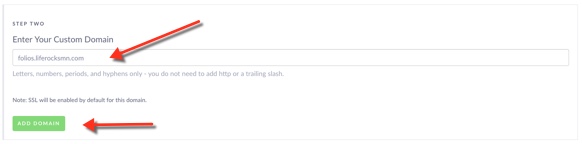
Select Add Custom Domain in the first domain section.

Enter your domain on the line in section two. You do not need to add http:// or www
Click the Green Add Domain Button
Note: the builder will check to make sure the domain is set up. If the domain is not set up correctly the system will not let you update and add the URL.
Once added there will be a grey circle with a check indicating the DNS is working. SSL is added automatically, and usualy updates within the next 3-5 hours. Once updated you will see a lock next to the URL.
An triangle indicates there is an issue. Domain updates can take up to 48 hours to go through name servers. If it has been longer than this, and your domain still shows the error, please check with your domain provider to make sure things were set up correctly
Step 3 - Adding a Custom Domain to your StickyFolios Site: Adding to a url to a Folio